Pages

Tuesday, June 30, 2015

Spray Paint Mythosaur Stencil Project (or how to enlarge an image)

Transferring a small image to a huge stencil is easier than you might think.  The cheapest method that I have come to love is the grid method:

  1. Find or draw your image - any size will do and this can be a physical picture or electronic.  Simple images work better for a good final effect.
  2. Mark even intervals around the edges - for a physical picture, mark with ruler and pencil - for an electronic image, use a program to evenly space markers around your edges (MS paint is the poor man's photoshop)  The smaller and more detailed your image is, the more sections you will need.
  3. Use the marks to draw an even grid onto the image.
  4. Prepare your larger surface that you will transfer to and make sure it's approximately the same proportions as your image (we used one side of a huge cardboard box)
  5. Divide the length and width of your large surface into as many sections as you have on your small image (if your image is 10 one inch sections across, you'll need to divide the width of your large surface into 10 sections)  Do the same for the height and leave a slight border around the edges depending on the material you're working with.  Make sure your spacing is even.
  6. Draw the grid on your large surface.  A yard stick may come in handy.
Here we will pretend I remembered to take a picture of the grid before drawing and cutting.

Now it's time to draw.  Match up your image grid to your surface grid using numbers or letters and draw the image onto your surface square by square.  This method allows you to accurately draw any image without needing a lot of artistic ability because you're only responsible for one square at a time.  Just draw exactly what's in each square onto your new object.

Then cut your image for the stencil using an exacto blade or utility knife.  Take your time with this step to cut exactly on the lines and trim any edges to smooth out the exposed edges.

All drawn and cut out!

Then we cut the whole side off of the box (leaving it in tact up until this point helped to keep it stabilized while cutting, which puts pressure on the material.)  If needed, add some painter's tape around the edges.  We found this to be necessary because our cardboard was very thick and had 2 layers inside.

All inside edges taped up.
Now the stencil is finished.  We laid it flat on another side of the box for a test run.  For the wall we will fix the stencil down to the surface to make sure we get crisp edges.

Test run - looks great!
The edges are a bit blurry in places, so we know where to add extra pressure for the real deal depending on how we want it to look when finished.  Red notoriously does not cover well, so this took about 3 coats with a fast drying art spray paint.

This was a surprisingly quick project once we finally got our act together and started on it.  Now it's time to adorn our bunker with the mythosaur for the glory of Mandalore.
Sunday, June 28, 2015

DIY K-Cup Holder


For K-cup storage in our small apartment, we needed something that would not take up shelf or counter space and would make our coffee selection visible.  And also it had to be as cheap as possible.  That automatically ruled out buying one for me.  For some reason little trays that hold plastic cups are very overpriced.  So DIY it is.  I decided to make a rack that would hang on the wall in the kitchen.  A simple flat thin box with holes for the pods.

For this project I chose a sturdy cardboard box from our stack of boxes from Amazon Prime.  The one I used was large enough to fit 4 columns and 8 rows of pods but any size will work.  First I need to determine how big to make the holes.  The top of one of my pods is exactly 2 inches across.  In order to catch the lip of the top and keep the pods from falling into the box, the holes should be a little smaller.  Just to double check I took a used pod and cut the top off where the first lip started.  About 1 and 3/4 of an inch seemed appropriate.  I used graph paper and the used pod to draw a circle on a note card to use to trace on the box.  A new pod fit perfectly in the hole.

Next I marked a grid on the box and use the card circle to trace the rows and columns for where to cut the holes and cut them out with an exacto knife.  I left about 1/4 of an inch between holes so it would be sturdy.  You could paint or cover the box with decorative paper or tape but I chose to leave the cardboard exposed.

Fill with your favorite coffee, and you're done.


Thursday, June 25, 2015

Understanding Flat Circular Crochet

Flat circular crochet can be worked in single, half double, and double crochet.  The stitch count for each row will be the same with any type of stitch.  The first row or round for single crochet is most commonly made up of 6 stitches.  Each row after the first will consist of an additional 6 stitches.  Using a starting round of 6, a typical pattern for a flat circle will look like this:

R1: 6sc in magic ring (or chain 2 and 6sc into the 2nd loop) [6]
R2: Increase in each stitch (2sc in each sc from R1) [12]
R3: Sc, inc around [18]
R4: Sc, sc, inc around [24]
R5: Sc, sc, sc, inc around [30]
R6: Sc, sc, sc, sc, inc around [36]

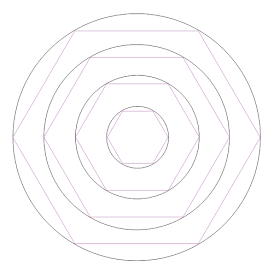
You can see that each subsequent round has one more single crochet added on to each repeat.  Another way to think about this is to imagine the circle you are building as a hexagon because you started with 6sc.  Each round, you repeat each row's pattern 6 times to form the sides of a hexagon.

Each row can be thought of as a hexagon.

This works with different numbers as well.  A starting row of 5 single crochets would make a pentagon and so forth.

This makes counting your stitches in each row easy.  For row 1, you have 1 stitch in each side of your hexagon.  In row 2, you have 2 stitches in each side.  For example on row 6, you can count as you complete each side: 1, 2, 3, 4, 5&6, putting both the fifth and sixth stitches in the same place in the previous round.

Using that method, a quick way to remember the pattern is this:

R1: 1 sc on each side (6 repeats of 1)
R2: 2 sc on each side (6 repeats of 2)
R3: 3 sc on each side (6 repeats of 3)
R4: 4 sc on each side (6 repeats of 4)
R5: 5 sc on each side (6 repeats of 5)
R6: 6 sc on each side (6 repeats of 6)

Each color is one sixth of the circle and each row adds one more single crochet.

There are two patterns for working the increases:

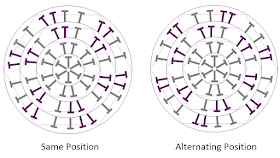
  • Starting each round the same way (either with 1 single crochet or with the increase) will give you a more hexagonal looking finished project with a slight swirl.  
  • Alternating rounds by starting with a single crochet in one row and an increase in the next will produce a more rounded project.  By staggering increases, they will not line up evenly and create angles in your work.


The shape of the project will differ depending on the placement of the increases.


You can also work the joining of rounds using two methods.  The first is to complete the final stitch of the round and slip stitch into the first stitch of that round.  Then chain 1 and begin the next round.  This will leave a visible seam in the work (which can be corrected with a special seamless join method) and will also leave the outside row more even if it is to be joined with other shapes.  The second method is to crochet continuously around, ending each row by completing the final stitch and beginning the next row immediately in the first stitch of the previous round.  This method leaves no seam but will look slightly uneven on the final round.  Using a stitch marker is a good idea for both methods to distinguish the first stitch of each round.