This has been on my idea list for a long long time. I'm trying to work through the list instead of just adding new ideas to it. It's meant to be a revolving door, not a bottomless pit.
So the basic design for this will use the pattern for a simple crocheted circle, but I'll switch out stitch types to shape it and keep the stitch count for each row the same. I may add some spike stitches for the light blue row and some longer stitches for the top of the last row to join it into the feather top. I want to add some of the long dangly feather parts later and I'm thinking of doing them as a strip of broomstick lace like I use for doll hair sometimes.
I plan on using embroidery floss (not sure on the strand count yet) to make it small and intricate. I may add a piece of wire partway through to add stability but I'll see how that goes.
Considering working in the back loops only to make a more pronounced color change.
I want to alternate each row where the increases are to make it more circular and less angular.
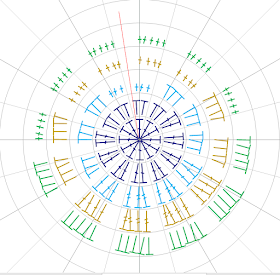
Draft Diagram:
Scrap yarn prototype:
Don't think I followed through on row three with my changes to include some triple crochets, and I'm not sure if the final round is better off with hdc or dc at the widest part.
Written pattern: (possible BLOs throughout for color changes)
- 12 DC in ring [dark blue]
- (HDC 2 in next)x2, (DC 2 in next)x8, (HDC 2 in next)x2 [darkblue]
- Sc 1, sc 2 in next, (HDC 1, 2 in next)x3, DC 1, DC 2 in next, (TRC 1, 2 in next)x2, DC 1, DC 2 in next, (HDC 1, 2 in next)x3, Sc 1, sc 2 in next [light blue] (consider spike stitches at beginning and end of round)
- (Sc 2 in next, sc 2)x2, (HDC 2 in next, HDC 2)x2, DC 2 in next, DC 2, (TRC 2 in next, TRC 2)x2, DC 2 in next, DC 2, (HDC 2 in next, HDC 2)x2, (Sc 2 in next, sc 2)x2 [gold or yellow]
- (Sc 3, sc 2 in next)x3, (HDC 3, HDC 2 in next)x6, (Sc 3, sc 2 in next)x3 [green] (consider longer stitches at beginning and end of round)
- Make some basic broomstick lace in green and add around - attach findings for earrings.
Now I just need to actually find some time and actually make them!
Actually working on something the next day and my mind hasn't wondered off to other projects. Strange.
Thoughts...
- I like the colors. They are I think all DMC. 796, 132A, 581, and 90A. I have a darker green in 580 that I might use for the tassles.
- Alternating increases and BLO work has giving it a nice detail. I also used a invisible color change/join. I like that except for the first 2 rows, all the colors are done in one row each but I could change that.
- I used a size 1.10mm hook, mostly because I couldn't put my hand on the 1mm I wanted and the .85 was too small. I think a slightly smaller hook will make it more compact and professional looking.
- Not sure on the final shape... the triple stitches don't hold their shape super well. Maybe some blocking a smaller hook will change that. I think the gold row could use some more longer stitches.
New version with 4 strands held together:
Thoughts:
- This is what I get for being so picky - now maybe it's too big - try just 3 strands held together?
- Spike stitches should go all the way down to the center and maybe add 1 or 2 more?
- Thing at the top didn't work, need more building up in surrounding stitches - also should I add a point at the bottom?
- Still using 1.10mm hook and it works much better with more thread.
First and second version together:


