snowy field image

snowy field image

Thursday, October 29, 2015

My Super Boring Hobby

I have a lot of 'boring' hobbies that involve staying inside and slapping around pieces of things until they make something else.  I have to restrain my excitement when I talk to people about what I do with my free time, because to most people, this is the equivalent of watching paint dry.  I love it though!  This is one of those hobbies.

Whenever I find a cool free crochet pattern online, I like to make a diagram of it for fun.  I like making little pictures and understanding construction through graphics.

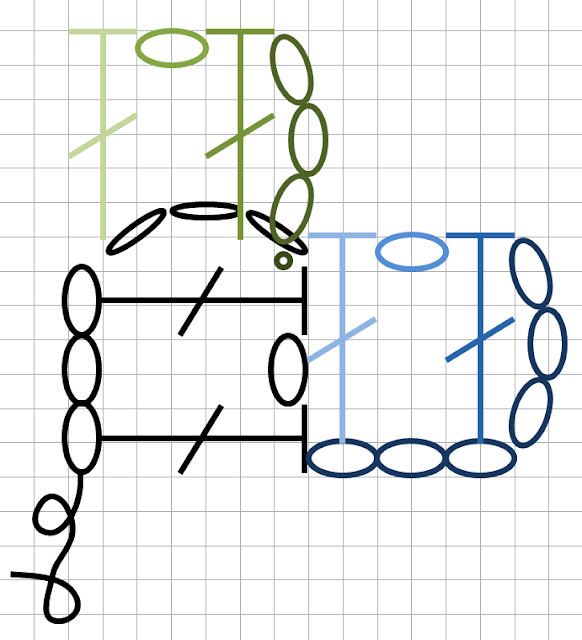
Here's an example from Moogly's Fortune's Wrap.

Row 1 says to chain 6, dc in the 4th chain, chain 1 & skip a chain, then dc in the last chain.  So I draw my little yarn tail, 6 chains, dc, chain, and dc.  Sometimes I like to fade the colors of each step so you can tell what order you're doing things and what direction you're going.

Row 1
Then for this pattern, you turn your work, so I turn the graphic around and turn it 90 degrees to the right so I'm ready for the next row.

Row 2 says to chain 6, dc in the 4th chain from the hook, chain 1 & skip the next stitch, then dc in the last ch so first I make that part in blue.  Then you put a slip stitch, chain, double crochet, chain 1, double crochet in the chain 3 space from the first row, so I put that in a different color.


Woo so fun!

Wednesday, October 28, 2015

How to Crochet a Faux Bullion Stitch Two Ways


I recently discovered the bullion stitch.  I love that I'm always finding new stitches and techniques to try but some of them are a real mess.  It looks amazing, but it's such a huge pain to make that I doubt I will be using them for anything extensive in the near future.  Mine were coming out looking like demented little tornadoes with all the loops popping off.

So here are two ways I've come up with to make a bullion-looking stitch without so much hassle:

1. The yarn over/horizontal puff stitch method

One row complete

Three rows complete

This looks pretty similar to the bullion stitch and you can adjust the height and how many loops you want wrapped around it.  You may have to poke the yarn on top a bit to get the loops into perfect position.  You can see on my little swatch that you have some half-looking loops, but that is fully correctable.  I didn't do anything fancy here, just worked three rows and worked each stitch in between the two below it, but you could work them right on top of each other and also include a single crochet or half double crochet row between the bullion stitches depending on how you want it to look.  I think it looks like a lot of little blue captain crunches.

This method is worked very similarly to how you would make a puff stitch, a lot of yarn overs and pulling loops up into the same space.  The difference here is that instead of working directly into a stitch from the row below, you'll make a chain and work around the chain as if you're doing a post stitch.  I have a lot of notes in the 'pattern' below because you can make a ton of variations for this depending on how you want to do it.

Directions: I started by chaining an odd number so that I would have a chain to skip between each stitch as these are bulky. (You could also make a single crochet foundation row that might be a little easier to work into.)  After the last chain, chain 3 more (or chain a lot more if you want a super tall stitch - it's totally up to you!) that will act as your first post.  Then yarn over, and reach the hook around the back of the chain as if you're working a post stitch and pull up a loop (3 loops on the hook).  Then you want to repeat this yarning over and pulling up a loop around the back of your chain a few more times (I did a total of three yarn over/loop pull ups around my 3 chains which will give you 7 loops on your hook, as 2 new loops are added for every repetition of yarn over/pull up loop.)  Then I yarned over one more time and pulled up a loop into the same beginning chain that I made my initial chain 3 into.  This is to secure the base of your stitch to the starting chain.  Then using the loop you just pulled up, continue pulling it through all of the loops you've created on your hook with the yarn over/pull ups.  (It may be easier to yarn over one more time and use that loop to pull through all the loops but I think it looks a little cleaner to do it the other way.)

To work more stitches, I chose to skip the next chain and insert my hook into the second chain away and chain 3 with the working yarn.  This way, you have nothing connecting your stitches in between them. You could make a really convenient crochet hook holder with these stitches because you can weave something big back and forth between the bullions very easily.  One additional variable you can throw in is that instead of chaining 3 for a post at the beginning of each stitch, you can work a double or triple crochet if you prefer that to chaining.  If you still want all your stitches to have spaces between, then be sure to wrap your hook fully around your double crochet including the yarn over bar.  This can be a little tricky because you're putting a lot of bulk into a small area and it's hard to see the bar.  The big difference is that the chain 3 will make the stitch a little flatter and the double crochet will make it a little fatter, so you decide if you want it flat or round.  One very last cool thing about this: if you weave your hook back and forth between these stitches after completing a row, it almost acts like a ribbing where half the stitches are pushed forward and half are pushed back and your hook will disappear in the middle.  Cool possibilities!


2. The double bullion/hairpin lace method

One row complete (into single crochet foundation row)

Two rows complete, you can see the right and wrong side

This method is similar to the other one, but you work your steps in a bit of a reverse order.  You start the same way by chaining/foundation chaining to set up, then either chain a few stitches or work a double crochet and work around it like a post.  The difference here is that instead of starting with a yarn over, you'll start by pulling up a loop around the back of your post, then yarning over and pulling through that loop and repeating, so you'll be working one half of the double bullion as you work around the post, and then at the end, you'll complete the second half by drawing through all the loops on your hook.  These have a 'double' look, or when scrunched together, look like double the amount of thinner stitches.  I say this is a hairpin lace method because the front and back do not look exactly alike, and there is a definite right side/wrong side when you use this one.  The back looks like a little hairpin lace or skeleton ribs to me.

Directions: Set up some chains or single crochet foundation row.  I worked into an odd number (but you can see in the photos that my side stitches bulge out a little, so maybe add a few?) and left one chain between each stitch.  To begin each stitch, either chain however many you want tall (I used 3) or double/triple crochet.  Now reach your hook around the back of the chain like a post stitch and pull up a loop.  Yarn over and pull through that one loop.  Then repeat pulling up a loop around the back and pulling a loop through it, each time adding one more loop to your hook.  When you have reached the bottom of your chain or double crochet, pull up a loop in the chain or stitch below your work to secure the stitch in place, then either pull that loop up and through all the loops or pull another loop through that one and then through all the others.

To work more stitches, skip one chain or stitch and work into every other stitch across your row.

You can see in the photo above that there is a right side/wrong side here, where you can see little bumps in the middle of your stitch in the wrong side.  You might want to work alternating rows of this stitch and single crochet or half double or something in order to keep your right sides facing out.

As far as I know, you can do everything with these two stitches that you could with a regular bullion stitch without the hassle.  Yay!

Wednesday, October 21, 2015

Frozen dolls in progress

Finally settled on a pattern for the dolls for my boyfriend's nieces and got started.  I keep getting sidetracked by other things so it's a bit slow going.  Really excellent free patterns for two sizes of similar dolls from byhookbyhand: http://byhookbyhand.blogspot.com/2015/02/simply-amis.html  Made some changes to the legs so they don't bend but I love the head design that can swivel.  This is a great intro to making dolls with movable joints which opens up so many possibilities for future projects.

I decided to crochet the doll bodies and sew on the clothes for more details.  There's a lot of cute embroidery to add here.  Still no hair done so they're looking a little bald but I want to get it right.  I think once the first set of dolls is done the second set should go much faster since I'm taking a lot of notes and making drawings and diagrams.  The little snowman should be easiest because he has no clothes and there are tons of reference projects out there for him.

Need some motivation to get working on these again.  I've noticed that if the excitement of the idea wears off before I'm done, it's bad news for that project.


Monday, October 19, 2015

Little Thread Bears

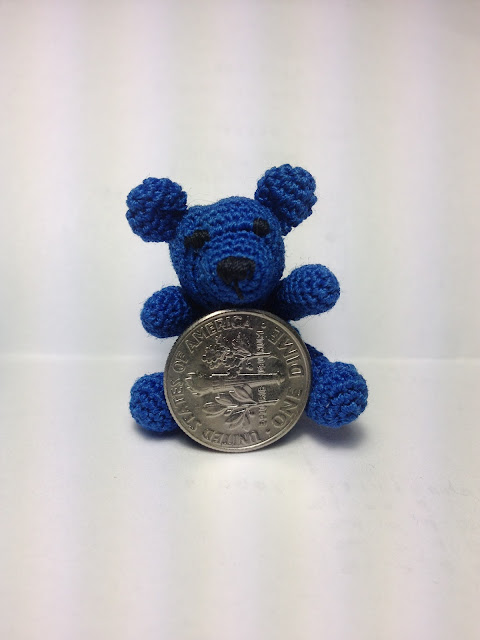
My latest mini project.  The larger lighter colored one is about 2 inches tall and made from size 10 crochet thread.  The smaller darker blue one is about an inch high and made from sewing thread.  Making the larger one first helped me understand the pattern and construction.  Both use this free pattern from Sheep of Delight: http://sheepofdelight.blogspot.co.uk/2013/01/free-amigurumi-pattern-polar-bearling.html


Wednesday, October 7, 2015

Tissue Paper Carnations

I love carnations.  They come in pretty colors, they're cheap, and they last a long time in a vase.  I do have to be careful that our kitties don't get into them though.  The ones I have right now are starting to die off and fall apart.  I was looking at them and thought how much they look like tissue paper so I thought I would try to make some.  They came out pretty well.  It's easy to find tissue paper in the right colors and the other materials are easy to improvise.

To make mine I used:
  • Tissue paper (if you want a pattern you could use cupcake liners, and they are already in the right shape)
  • Safety eyes (you could also use brads)
  • Thick paper/card stock/note cards
  • Glue & tape
  • Drinking straws
  • Green paper/washi tape/floral tape (mine was origami paper)

To start I cut some small squares of tissue paper.  I didn't really measure this, I just folded the length of tissue paper until I had it down to a small enough size and then made squares based on the folds so I could cut a lot at one time.  Probably around 3 or 4 inches square and it's ok if they are not perfect because you will be cutting them.  I used about 10-12 squares for each flower, and it's best if you cut all the squares you want for each flower so they are the same size.  You could use more or less squares depending on how full you want the flower to look.

To make the flowers, fold each square in half and then into thirds to make a 6 petal flower.  Then cut through all layers to make a petal shape.  You can also cut slits in the top of the petals to make them look more realistic.  (I tried to use my pinking shears for this but they're really cheap and just smooshed everything around.)  Then open it up to see your flower.


Once you have all of your flowers cut out, poke a hole in the center of each flower and stack them all up together.  Make sure they're all turned different directions so the petals don't line up.  Push your safety eye or brad through all the holes and secure.  I used a safety eye here and it was a little difficult to close the backing without tearing the paper.  I popped the backing onto the first notch with my hands and then set it right side up with the backing resting in the groove of a spool of thread and tapped the top of the eye with a hammer until it closed.

When they are all secured together in a stack, use your thumb and index finger to make a circle and push all the petals upward and together.  Squish the bottom a little to help it take shape.  To preview how it's going to look with a different number of petals, you can use the cap of a marker or seam ripper and a pen or crochet hook to gently push the petals down into a cone.

For the stem, I used some drinking straws.  I wanted the stems to be a little thinner than the straw so I cut a slit up the length of the straw and overlapped the edges a bit and taped it back together.  I finished the stem with pieces of note cards and green paper.

I still need to take some pictures of my finished flowers!

Friday, October 2, 2015

More Realistic Crochet Figure

Taking a look at my little humanoid figure, it seems that he's not up to par on realistic proportions.  It would be fun to make another that is a little more accurate in that respect, maybe even with moveable arms and legs using safety eyes like a brad to attach completed pieces.


Thursday, October 1, 2015

Homemade Hanging Pocket Organizer

These aren't too expensive to buy but it would be so easy to make with extra cloth, which I have a ton of.  You could make any size or dimension for a nice custom design.

Basic plan:

Make a big rectangle of cloth for the back, grommets for hangers or tube for curtain rod.  The backing cloth should be thick or doubled for stability.

For the pockets, sewing long strips of cloth with all finished edges.  Fold back and forth to create the pockets and sew along the bottom edge and side/between each pocket.  Straight stitch to attach and zigzag over top for stability.

Make a paper pattern first to confirm size for pockets and get the right size for the backing.