Spherical crochet is more complex than flat circular crochet because you're adding a third dimension. This took me quite a bit of work to finally get it and figure out patterns that would work for me. There are several excellent resources for not only calculating patterns, but understanding the math behind it:
- The Ideal Crochet Sphere This is where I originally became fascinated with the idea of the most perfect sphere possible with single crochet instead of a spherical-ish lump. Making amigurumi magnifies the importance of shaping on a small scale. For me, this was not a deep enough explanation of the math for me to understand, and although it does provide patterns, I don't frequently need a specific number of rows for a project as a base for size.
- Ravelry user Khold's explanation and an awesome pattern generator based on stitch size and desired ball size. For someone like me, the math here is a little over my head so I needed to start at the very beginning and work my way up to understanding sine and cosine and theta. The pattern generator doesn't always work with every set of data you put in so some adjustments might need to be made.
- Another type of pattern generator for spheres and also this amazing crochet lathe for generating patterns based on drawings. This one is cool because it allows you to choose your max number of stitches for the largest count row and generate a pattern based on that.
This is all correct as far as I can figure out: In order to help myself understand the math, I decided to start at the very, very beginning.
So here we have a circle and some related terms:
The circumference of a circle is the distance all the way around the outside, where every point is the same distance from the center.
The diameter of a circle is the length from one point on the outside of a circle that passes through the center point and continues to the other side.
The radius of a circle is the length from the center point to anywhere on the outside.
The relationship of the circumference to the diameter (or twice the radius) is the same for every circle, and that is called Pi, 3.14159... To find the diameter of a circle, divide the circumference by pi and to find the circumference of a circle, multiple the diameter (or radius times 2) by pi.
d = c / π
c = d * π or c = r * 2 * π
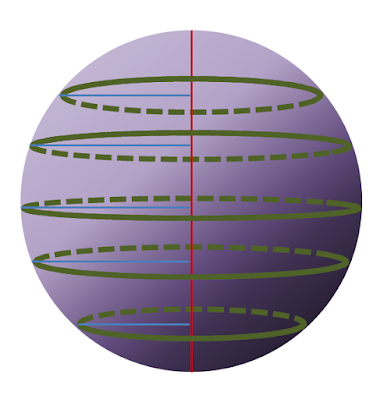
And here is a sphere with it's circumference, diameter, and radius marked:
So now, we need to relate these ideas to crochet. A crochet ball will be made up of a certain number of rows and each row will have a number of stitches proportional to it's position within the sphere. If you imagine slicing the sphere into equal parts, each slice would represent a row and would have it's own new diameter, radius, and circumference.
(If the number of slices, or rows, is even, row 1 and 10 will have the same number of stitches (6 for example), as will rows 2 and 9 (11 or 12 for example), etc all the way into the middle. For an odd number, there will be 1 row in the middle without a partner.)
Measuring angles within a circle or sphere created by radii is done in degrees. Each circle has 360 degrees and because the circumference is the radius times 2 times pi, 180 degrees (or half a circle) can be thought of as having the value of 1 pi. A circle with a radius of 1 will have half of a circumference of pi (3.14...), and half of the degrees of a circle is 180, so 180 = π and 360 = 2π.
Looking at an interactive unit circle like this one:
Interactive Unit Circle, you can see that moving the radius around the circle between 0° and 180° creates an arch shape on the graph on the right in red. You can also see that the red value is called sine and the value of sine goes from 0 at 0° to 1 at 90° and back down to 0 and 180°. The value of sine is the height of the top half (and bottom half) of a circle with a radius of 1 at different degree points because it is measuring the relationship between the angle within the circle and the side of the triangle opposite that angle that is formed by the radius, the x-axis and the height of the circle at that point. The graph on the right plots the value of sine from 0 to 1 to 0 to -1 and back to 0 depending on what degree you are measuring.
This is the very beginning of trigonometry: the
Right Angle Triangle and how
Sine, Cosine, and Tangent relate to it. Sine, cosine, and tangent are the terms for what you get when you divide the length of one side of a right triangle by the length of another side in relation to one of the angles inside. For figuring out values for an perfect sphere, I really only want to deal with sine to make it more simple. The way to get your value for sine is to divide the side opposite of a given angle by the hypotenuse, or
sine(angle) = Opposite / Hypotenuse.
 |
| Labels for a right triangle |
So looking at the triangle, the purple angle labeled "a" on the bottom left side is on the opposite side of the triangle from the yellow side, and the blue line is adjacent to the purple angle, "a". The hypotenuse is always the long side. So to figure out values for sine in proportion to a given angle, like "a", you divide the length of the side opposite the angle (yellow) by the length of the hypotenuse (black). The sides of the triangle that are adjacent or opposite will switch depending on which angle you are looking at.
For angle (a), the horizontal blue side is adjacent to the angle and the yellow vertical side is opposite the angle. For the sine of angle a, you would divide the length of the yellow side by the length of the hypotenuse, sin(a)=O/H.
For angle (b), the yellow vertical side is adjacent to the angle and the blue horizontal side is opposite the angle. For the sine of angle b, you would divide the length of the blue line by the length of the hypotenuse, sin(b)=O/H.
When you assign lengths to the sides, you find that the results are always a decimal between 0 and 1. This is because you will always be dividing a smaller number by a larger number since the hypotenuse will always be the longest side of the triangle.
So in the circle below with a radius of 1, the red lines are different values of sine based on the angle between the x-axis and the radius (in gray), which is acting as the hypotenuse of our triangles. For our sphere, we will need to measure equal intervals of degrees and sine values in the amount of rows that we want.
 |
| This circle is just like the purple sphere above, with the read lines of sine values cutting it into slices. |
So to get correct numbers for stitches per row, the pattern should scale with the plotted points of sine on a graph like the one below, where the values of sine (0-1) are listed on the left and degrees (0-180) are listed along the bottom. If you changed the sine values to stitch numbers and the degree values to row numbers, you would be able to plot stitches per row based on the shape of the arch.
 |
| Values of sine from 0 to 180 degrees. |
Data for a 10 row ball should look like this:
 |
| Don't let this circle divided up confuse you. It will have a different number of divisions than a picture of a sphere divided into the correct number of slices because here, the number of slices is represented by the data points, not the spaces between. |
So my first thought about this arch shape was: why is the graph an arch shape and not a circle, like the circle it is representing? Because what you are seeing represented by the arch are the values of the distance of those red lines between the X axis and the top of the circle, and not the smooth sweep of the clock-hand radius, the heights change at a different rate depending on what part of the circle they are on.
 |
| Values of sine at 15, 30, 45, 60, and 75 degrees. [source: Mathisfun.com] |
As you can see in the above diagram, the values for sine climb very quickly at the beginning, and taper out toward the top. At 30 degrees, the line is already half of the total radius, at 45 degrees it is almost 3/4 of the radius. Toward the top, the ascent slows down. Imaging climbing a mountain shaped like a circle. Starting at 0 degrees and going up toward 90 degrees, you would begin by climbing straight up, then toward the top, you would be able to walk on a flat surface. So when the is translated to stitches and rows, you should expect to start by increasing quickly in your first few rows, then only increasing a few stitches per row toward the center of the ball and then decreasing quickly to finish off the ball in the last few rows.
So the basic idea is that because you know the height of your stitches, you can determine the circumference based on desired number of rows (or start with a circumference and divide it by the height of the stitches to determine number of rows) and use that information to find the diameter and circumference of each row using the value of sine and divide it by the width of stitches to determine stitches per row for each row.
Ok - time to apply all of this to crochet:
First, it's important to know how wide and high your stitches are. Your hook size, yarn size and type, and personal crocheting style will all factor in to the relationship between the width and height of your stitches. For amigurumi, and crocheting spheres in particular, I use a much smaller hook than the yarn recommends to make tight shapes without visible holes. My stitches are just about the same width and height, but a little wider than they are tall. For example if I'm using a yarn that recommends a 5mm hook, I'll use around a 3.75mm hook. For me, that measures about 6mm wide and 5 mm high. Other people may have slightly wider stitches - in general, stitches will be about the same width and height, or slightly wider than they are tall. Measuring accurately on a test swatch can be the difference between a perfect sphere and one that is too short or too wide. I made a swatch in back and forth rows and one in a tube in rounds and it did not seem to make a difference when measuring stitches.
Next, we need to know the variables that go into a crochet sphere: total circumference, total diameter, number of rows, stitches per row, angle and sine value per row, circumference per row, diameter per row, stitch height, and stitch width. When making a sphere, you will start with some of this data and use it to figure out the rest.
There are a few scenarios I can think of where you would start with different data to determine how to calculate your pattern:
- Scenario 1: When you need a specific size ball. This seems like the most likely scenario. You know the dimensions of the ball (diameter and circumference) and you need to figure out how many rows and stitches you will need to make in order to achieve your desired size. In this scenario, you will divide the circumference in half and divide that by the height of one stitch (from a swatch) to get the number of rows in the sphere. It will likely be a decimal, so round it to the closest whole number to get as close as possible to matching your final dimensions. (Why half the circumference? If you divided the whole circumference, you would get twice the number of rows because the second half of the circle is redundant in determining how many slices to cut out of a sphere.) Then divide 180 degrees (the measurement of half a circle) by your number of rows + 1 to get the interval of the angle that you will need for each row. (Why + 1? You are dividing half of a circle, or 180 degrees, into sections. The important thing here is not the sections of angles, but the degree of the angle between sections. Your data points will fall between the sections, so you will have 1 fewer data points than sections. In order to get the right number of data points, add 1 to the number of rows you are dividing by.) Then based on the degree of each angle, find the value for sine using a formula or an online sine calculator. Then find the circumference of each row by multiplying the sine value by the total circumference of the sphere. Lastly, divide each row's circumference by the width of one stitch to find the total number of stitches in each row. This number will also need to be rounded to the closest whole number. Note that you will get a better result by starting with your desired circumference, dividing half by your stitch height, then adjusting your circumference so it evenly divisible by the height.
- Scenario 2: When you need a specific number of rows in your ball. You know how many rows you want and the dimensions of your stitches and you need to figure out how many stitches will be in each row to make a perfect sphere. Start out by multiplying the height of one stitch by the number of rows you want. This will give you the length of half the circumference of your finished ball. From there you can find the whole circumference and the diameter. You now have all of the same information for making a specific size ball. Divide 180 by number of rows + 1 for the interval angle, calculate the value of sine, multiply sine by the total circumference, and divide each row's circumference by the width of one stitch.
- Scenario 3: When you need a certain number of stitches in a certain row. Maybe most commonly you would know how many stitches you want in the biggest row in the middle of the sphere. You would pretty easily be able to determine your other info by multiplying the number of stitches by their width to determine the circumference and then following along above. But it would also be possible to start with, for example, I need 20 stitches in the 4th row. You would also have to have some idea of how big or how many rows the total sphere should be, because you could arrive at any number of sizes with just that information. Perhaps the easiest way to start would be to look at an interactive circle and place your row somewhere between 0° and 90°. For example, let's call 30° row 4, and we know that row 4 will have 20 stitches. So now we know that between 0° and 30°, we need 3 more rows. Divide 30° by 4 to get 3 more data points for rows 1 through 3 and you get your degree interval of 7.5°. Then divide 180 by 7.5 and you get 24 sections (or 23 data points) so you know your whole sphere will be 23 rows. Then you can follow the steps above to multiply stitch height by number of rows and find the circumference, diameter, etc.
I made a little google sheet with a full explanation and calculations:
Update: also want to give a shout out to this blog with a different method of figuring spheres, rough translation though. http://www.gallimelmas.com/2014/03/anatomia-de-un-amigurumi-la-tabla-del-6.html


