snowy field image

snowy field image

Sunday, March 27, 2016

Crochet Rose Applique


I don't normally buy crochet patterns.  Half the fun is figuring out how to make what I want.  Once in a while, though, I find something really pretty that someone has put a lot of time and effort into.  I found some really beautiful and intricate flower patterns on etsy a few weeks ago and I've been making tons of little rose appliques.  I was really impressed by how realistic her flower patterns are.  They call for very fine thread (size 20 crochet thread) which helps get that shaping.  Here's a link to the pattern that I bought:

https://www.etsy.com/transaction/1122932112

The shop is Happy Patty Crochet and she has tons of amazing flower patterns.

While the pattern is easily accessible, size 20 crochet thread can be hard to find for a good price in the colors you want.  I've ended up trying out a few alternatives.  Embroidery floss and thread for friendship bracelets have turned out to be some pretty good options.  The main benefit of course is the color availability.  Easily hundreds of colors in solids, variegated, metallics, etc, but in order to get the correct size for a 1mm hook, you need to work with just 2 strands held together, so there's a lot of thread separating to do.  For the friendship thread, you need to separate the two strands that are twisted together, which weakens the thread and can cause it to break if you're not really careful.

The rose in the photo above is made with three colors of friendship thread.  In the last picture is the thread before separating the two strands.  Once separated, the strands have a fuzzy soft quality that squishes the stitches together.  I really like how the final piece comes out, but the thread does break a lot so it's a pain to work with.

I love making really small projects and this finished flower is about 1 1/2 inches across.  Really fun!

Sunday, March 13, 2016

How to Crochet Garter Stitch


Like many crocheters, I'm fascinated by crochet stitches that look knitted.  There are plenty of patterns for recreating stockinette but I've never seen one for garter.  I had a happy little accident today and figured out one way to do it.

This is worked in tunisian crochet and is very simple to do.  Chain any number you like and then pick up stitches in the chain back across.  I like to pick up stitches in the bump of the chain.  Work back pulling through 2 loops at a time like you normally would. When you go to pick up stitches in the next row, I pick up the stitches through the back bump loops on top instead of the vertical bars.  This is what creates the look of the garter stitch.  You're always working on the backside of the piece, so you'll need to turn it over to see how it's going.

Here's the crochet swatch next to one that is actually knitted:

Crochet on the left, knitting on the right.
Not exactly sure why I find this so exciting considering I know how to knit as well, but it was fun to play around with.

Sunday, February 21, 2016

The Fleeb


Everyone has a plumbus in their home, but how do they make the plumbus?  Well I'll tell you: fleeb has a very instrumental role.  It's important that the fleeb is rubbed because the fleeb has all the fleeb juice.  But how do they make the fleeb in the first place?

Today on How They Do It: Fleeb

Body:
For the body of the Fleeb, cotton worsted weight yarn is used.  Make sure your 4mm hook shows up to rub the yarn.  The body consists of single crochets and bobble stitches.  (For these bobble stitches, work 4 double crochets together in the same stitch.  Make 1 body.

  1. Sc 8 into a magic ring.  Slip to first stitch. (8)
  2. Sc in first stitch, sc and bobble stitch in the next.  Repeat around. (12)
  3. Sc 2, inc around (16)
  4. Sc, sc + bobble around (24)
  5. Sc 2, inc around (32)
  6. Sc, bobble around (32)
  7. Sc around (32)
  8. Sc, bobble around (32)
  9. Sc around (32)
  10. Sc, bobble around (32)
  11. Sc around (32)
  12. Sc, bobble around (32)
  13. Sc 2, dec around (24)
  14. Dec, bobble around (16) [Stuff some polyfill in now]
  15. Sc 2, dec around (12) [Stuff to satisfaction]
  16. Dec, bobble around (8)
    Cut yarn and use tail to sew the remaining 8 stitches shut.  Weave in both ends.
Arms:
Using size 3 cotton crochet thread, we'll make the arms out of chains and slip stitches.

Chain 15 (the length of the arm) + 6 (the length of the first finger).  Slip stitch into the second chain on the hook and the next 4 stitches (5 slip stitches).  I work these into the back bump of the chain.  Now chain 6 more and slip back into the second chain from the hook and then next 4 stitches.  Repeat this one more time (ch 6, slip 5).  Now slip into the 15th chain from the beginning which is where the fingers meet the arm.  Slip into all of the rest of the chains.  Make 2 arms.

Eyes:
Using size 3 white cotton crochet thread, we'll make eyes and sew on a red bead for the pupil.
  1. Sc 6 in a magic ring.  Slip to first stitch.
  2. Chain 1, sc 2, sc 2, hdc 2, sc 2, sc 2, hdc 2, slip to first stitch.
Using red sewing thread a 2 seed beads, sew the beads onto the center of the eyes.  Make 2 eyes.

Construction:

The top of the fleeb will be row 1 and the decreases will be on the bottom where the fleeb juice comes out.  Sew on the arms using the two tails. (Thread one of the arms through the body, tie the two tails together and pull the tails through the work and cut.)  I have sewn my arms between rows 13 and 14, about 6 bobbles apart.

To attach the eyes, choose two bobbles in row 13 and push them inwards so they invert.  Place the eyes over the inverted bobbles and pin in place.  Use white sewing thread to attach.

The fleeb is now ready to aid in the construction of the plumbus.

Saturday, February 20, 2016

3 Scoops Crochet Mittens

Diamond stitch cone and strawberry, chocolate, and vanilla ice cream.

Waffle stitch cone and raspberry, lime, and blue hawaiian sorbet.

Yay mittens!


I love ice cream in the winter.  Also all the other seasons, but especially in the winter.  These ice cream mittens are zero calorie and super fun to make. 

This was a fun opportunity to combine some different textural stitches I've been figuring out.  The cuff can be worked in either diamond stitch or waffle stitch or one of your own design.  There are also tons of variations for the ruffle at the bottom of the scoops of ice cream.  I used half double crochet and 3 scoops but you can really go wild.  I also alternated between half double crochet and BLO + third bump hdc to make it look like the little lines that form when you scoop.  The idea is to make the bottom part cone-y and the top part ice cream-y, so do whatever puts the nuts on your sundae.

You can customize the size to fit any hand during the first row.  The stitch count will be slightly different depending on what style cuff you want because the stitches are worked in different multiples.  It will be within a few stitches and I can't tell the difference in the two I made.  I didn't finish my thumbs but you could if you wanted.  I was playing around with the idea of making the top of the thumb part of the first scoop but then I got lazy.

I did plan ahead enough to leave a gap for my finger to stick out for my phone.  You can really do this with any mitten pattern and it's really easy.  Just make a chain or single crochet foundation row and skip some stitches in the appropriate place and keep going.

Hole for your finger!

Peek-a-boo!

The ruffle might be intimidating if you've never worked those 3D stitches before, but once you get the hang of it, you'll be thinking of everything you can do with it.  I decided on mostly half double crochet stitches for this project and that's what the ruffle uses too.  I tried a bunch of different stitch types and counts for the ruffle but I think I like this best (for this project at least).

Pattern

Stitches used (sort of a lot, sorry!): single crochet foundation row or double crochet foundation row, double crochet, half double crochet (plus increases and decreases), front post triple crochet two together, half double crochet 3D stitches, half double crochet worked in the back loop only + the third bump.

Yarn: worsted weight acrylic in multiple colors.  I used whatever colors I had in my stash - just have fun it doesn't have to be perfect.

Hook size: I used a 4mm (size 8 or F) hook but use whatever you like with your yarn.  I liked using a smaller size than the yarn called for to make the stitches tighter and less hole-y.

Gauge: Gauge is not super important, you just have to make sure you're choosing the correct number of stitches to start with.  I made one of each type of mitten so the stitch count is slightly different but they both still fit.  You can add or remove rows in several places to make it bigger or smaller.

Cone base (wrist):
  • Option 1: Diamond Stitch Cone
    Diamond shaped stitches are worked by alternating rows of double crochet and single crochet with long post stitches dipping into the rows below.  Mooglyblog has a great project using this stitch.  This pattern repeats over 4 stitches and 4 rows.
    Row 1: SCFR 28 (this needs to fit around your wrist/forearm comfortably and can be any number in multiples of 4.  28 fit me best with my yarn and hook.) Slip to first stitch and use the tail to connect the bottom of the stitches.
    Row 2: DC in each stitch (28)
    Row 3: This is the first row of the diamond stitch with single crochets and long post stitches. Ch 1, sc 3, FPTRC2tog in the 2nd and 6th stitch from the first row of scfr.  Skip the next stitch and sc 3.  You'll then repeat this around, working 3 sc and then working post stitches together in the first row, skipping 3 stitches between each when you place the posts. (This can be confusing if you've never worked the diamond stitch before.)
    Row 4: DC around (28)
    Row 5: Ch 1, sc 1, FPTRC2tog, sk1, sc 3 (repeat around)
    Row 6-9: repeat rows 2-5
    Row 10: HDC around (28)
    Don't break yarn - move down to hand section
  • Option 2: Waffle Stitch Cone
    The waffle stitch is worked in multiples of 3 stitches over two rows.
    Row 1: DCFR 27 (this needs to fit around your wrist/forearm comfortably and can be any number in multiples of 3.  27 fit me best with my yarn and hook.) Slip to first stitch and use the tail to connect the bottom of the stitches.
    Row 2: Ch2 and DC in the same space (or make a standing double crochet).  Back post DC in the next 2 stitches. Repeat 1 DC, 2 BPDC around (27)
    Row 3: Ch 2 (don't count this as a stitch) FPDC around the normal DC from the last row and DC normally into the 2 BPDC from the last row.  Repeat this around.
    Row 4-7: Repeat rows 2 and 3 twice.
    Row 8. HDC increase once, HDC around (28) (this is because you need an even number in the next section)
    Row 9. HDC around, working into the black loop and the third bump (3rd bump adds stability) (28)
    Row 10: There's not a row 10 for this stitch.  Have a drink - you've earned it!
    Don't break yarn - move down to hand section
Cone top (hand): Using whatever base you selected, you will now start increasing in one side to make room for the thumb.  I like to mark my increases with a stitch marker so I don't have to count: mark the first stitch of the first increase and the second stitch of the second increase and make your subsequent increases in the marked stitches.  Move your markers up in each row.

Row 11: Both bases should have 28 stitches in their final row.  Working into your base: HDC inc in the first two stitches and HDC around (30)
Row 12: HDC inc, HDC 2, HDC inc, HDC around (32)
Row 13: HDC inc, HDC 4, HDC inc, HDC around (34)
Row 14: HDC inc, HDC 6, HDC inc, HDC around (36)
Row 15: HDC inc, HDC 8, HDC inc, HDC around (38)
Row 16: HDC inc, HDC 10, HDC inc, HDC around (40)
Row 17: HDC inc, HDC 12, HDC inc, HDC around (42)

1st Ice Cream Scoop: In the first row, you will separate the thumb from the rest of the hand.  If it feels wrong for your hand, you can move the stitches around a little for more or less thumb room.

Row 18: Place a stitch marker into the 2nd and 15th stitch to pin them together. You will be working single crochets in the back loop and the 3rd bump of the HDCs in the row below.  With an ice creamy color, sc in the first stitch, then into the 16th stitch.  The thumb is now isolated from the rest of the hand.  (Try it on now and adjust it a little if it doesn't fit.  Make sure the hand has an even number of stitches.)  Sc around (28)
Row 19: HDC around (28)
Row 20: This row is the ruffle at the bottom of the scoop.  We will be working around the half double crochets from the previous row.  When you work into the top of the stitches, only work into the front loop.  You will use the back loop in row 21, so be careful not to use it now.  To create the ruffle, you'll be working 3D HDCs around the posts of each stitch and also into the top of the stitch and the sc from 2 rows ago.  Ch 2.  In the first stitch, work in the front loop only, HDC 2.  Then you will work 2 HDC around the post of the next HDC from the previous round.  (To do this, turn your work 90 degrees clockwise.)  Then put 2 HDC into the Sc from 2 rows ago.  Next, you'll work 2 HDC into the next post (turning counterclockwise helps here).  You've now completed one repeat of the ruffle stitch.  Keep working around until you get back to the beginning and slip into the first HDC.  You now need to 'get back' down to work into the back loops of HDCs from row 19. Slip stitch into the ch 2 at the beginning of the row and also into the back loop of the first stitch from row 19.
Row 21: HDC into the back loop only of round 19 and also the 3rd bump (adds stability) (28)
Row 22: HDC around (28) (For added texture, alternate regular HDCs and working into the back loop + third bump)
Row 23: HDC around (28) (For added texture, alternate working into the back loop + third bump and regular HDCs)

2nd Ice Cream Scoop: Start a new color, join in any stitch. (I like to keep my seam on the thumb side of the mitten.)

Row 24: Sc in the back loop and third bump of the HDC below (28)
Row 25: HDC around (28)
Row 26: Repeat row 20
Row 27: Repeat row 21
Row 28: Repeat row 22
Row 29: In this row you will work 2 HDC decreases and HDC around the rest of the stitches.  The decreases should be placed on either side when the mitten is laid flat.  Your stitch count may be different than mine.  (26)

3rd Ice Cream Scoop: With a new color, join in any stitch.

Row 30: Sc in the back loop and third bump (26).  If you want to leave a small hole for your finger to stick out so you can swipe your smart phone, sc around until you reach the place your finger will stick out.  Either chain 4-5 or scfr 4-5 and then skip 4-5 stitches and keep sc'ing around.
Row 31: HDC around, making 2 decreases, one in each side of the mitten (24)
Row 32: Work row 20 again
Row 33: HDC in the first two stitches, dec and repeat around (18)
Row 34: HDC, dec around (12) 
Row 35: Dec around and close with tail.  You're all done!

Thursday, February 4, 2016

Paper Piecing Rick Sanchez

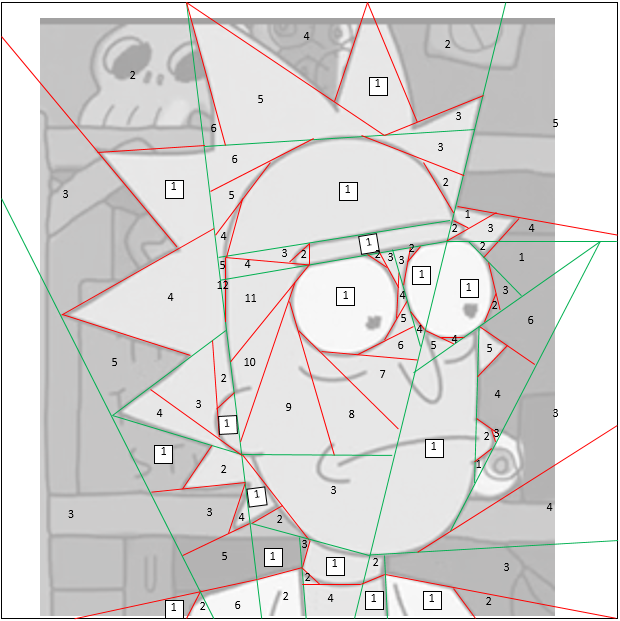
Although I've never done any quilting before, I'm fascinated by paper piecing.  Regular quilting seems a little too intimidating, but the paper thing I think I could do.  Rather than starting simple, I decided to try to figure out how to do it on a very complex design - what could go wrong?  This is probably another thing that I'll make and then never think about again, but it was fun.  I had a few false starts.  Designing paper piecing is harder than it looks.  I think I've finally got something that could be used to actually make something though.

The green lines are separate sections and the red are different pieces within sections.

Photo reference behind all the lines.

Lines and photo overlayed with section guide.

Just the section guide so you can kind of see how you would put it together.
I don't quilt so that could end up being worth nothing, but it was good experience I think.  I did quite a bit of looking at other people's block designs to figure out how to section off a big, complicated piece.  It makes sense to start by slicing through the whole picture so I broke it up into 4 larger vertical pieces and then went from there.  I feel like I was losing my eye for figuring it out after a while.  I have some issues with the P and Q sections... can you make a smaller section and then use it as one of your number in another, larger section?... I think it could work, you'd end up cutting out your pattern multiple times though so maybe that's why people don't do it.  

I do want to try some of this soon but my own design would probably be an awful place to start.  It would be fun to do a lot of different characters and make a quilt of them.

Monday, February 1, 2016

Knitted Octopus (pattern from Hansi Singh)


This pattern comes from Hansi Singh's wonderful book: Amigurumi Knits: Patterns for 20 Cute Mini Knits, which I highly recommend.  I received a copy from my lovely boyfriend when I first started knitting and I've really been too intimidated to try anything until now.  I was wondering if I would have a "can't believe I waited so long to do this" moment, but as complicated as these are, I'm glad I did wait.

Lurking background tomato
This is my first knitted amigurumi item.  (I also did the tomato from the same book but it's not nearly as exciting.)  It's strange how in crochet, I would consider amigurumi accessible to the beginner, but in knitting... not a chance.  This is probably the most complicated knitted item I've made so far.  Keeping all the different types of increases and decreases straight was a challenge.

Eye bulge extraordinaire
I did have some trouble with leaving gaps from incorrectly done increases (thanks for nothing, M1R & L, you tricky bastards!) and from picking up stitches to join the shapes together.  I like the way the construction is done, though.  It really eases you into the design and use of short rows which was new to me.  I like that the jacket of the book can be used as bookmarks for the tutorial section.  I had to make some sticky note pointers to locate each stitch guide on the pages though because they're a bit thrown together to save space.

Octopus and tomato
Inside the legs are pipe cleaners to give him some gripping and posing power.  I was worried about running out of the purple yarn so I added those green head stripes.  It was a near thing.  I decided to add the eyes, which are done separately with crochet (6sc in a ring, 12 sc, 8 sc), stuffed and embroidered with black and white in a little square.  Apparently that's how octopuses like to do their eyes.  In a square.

All done, ready for world domination
I may add some sequin or beaded suckers on later when I'm not feeling quite so glad to be done with the whole thing.  I did this over a series of evenings between different things so it was a lot of picking up and putting back down again.  Feeling happy to have this completed and a new skill learned.  My little project on ravelry.

Monday, January 25, 2016

The Taking Tree

It's funny how differently we remember books from our childhood.  I remember thinking that the boy in The Giving Tree was just an ass. The Unknown Orchard presents: The Taking Tree.


Monday, January 18, 2016

Adventures in Giant Knitting and Claire's Cowl


I've been wanting to make this beautiful giant knit for a while.  I love the look of very big or very small stitches so this one is right up my alley.  I had to improvise a bit on the needles and yarn.  The pattern calls for 19mm needles and chunky yarn and I didn't have either.

My improvised needles are 19mm dowel rods with the ends carved down to points.  I just happened to have the dowel rod pieces in the house and they were already cut to perfect lengths so I really just had to make them.  It was a new process and very interesting.  My wood pieces are actually two different kinds of wood.  The shorter one is lighter colored and much softer.  It was easier to carve but the finished needle is more prone to dents and pokes from the tip of the harder one.

For the carving process, I chose a pocket knife with a partially serrated blade (I don't know that I would have been able to do it with a smooth blade, especially with the harder wood).  For the pointed tip, I started about an inch and a half back from the end and gently started to remove some wood until I had a rough pointed shape.  Then I carefully smoothed it out into a proper point.  I probably did this a dangerous way, but I found it a lot easier to pull the knife toward me to remove the wood rather than slashing away from me.  I took as much care as I could and didn't have any unfortunate accidents.  I did round off the back ends of the rods so the corner edges wouldn't poke me.  I found knitting in a big size requires a lot more whole body action.

After I was happy with the basic carved shape, I sanded it with first a coarser 80 grit sand paper and then with a very fine 220 grit.  The sanding actually got it to be very smooth.  I did rub the raw areas with a tea light candle to get a bit of wax into the tiny grooves.

I really can't believe how well these turned out in terms of smoothness and ease when knitting with them.  I didn't have any issues with the yarn snagging or hanging up on any rough spots and the wood was light enough to be easy to work with.

For the knitting project itself, I held 4 strands of worsted weight acrylic together and made a garter stitch rectangle about 21 stitches by 60 or so rows.  I did not add a twist for the mobius style on this one.  This was really fun and I learned a lot.

Knitted Brioche Stitch Scarf


Knitting is not my strongest skill but there's something wonderful about the rhythm of working with needles that you don't get from a crochet hook.  I got three big balls of yarn from my boss for Christmas (I love my boss! - and I know that not all people do so I feel very lucky there.) and with the time off from work I had over Christmas  break I decided to do something with them.  With the yarn being big and chunky, and having a lot of it, I thought it would be perfect for a knitting project to make a huge squishable, warm winter scarf.

I stumbled across the brioche stitch while looking for patterns on ravelry and it looked like the perfect easy stitch to learn for this project.  I did need to watch videos instead of relying on written instructions, though.  At my knitting skill level, those written instructions can result in a variety of weird things coming off my needles.  I started off with two straight needles but then decided to switch to my interchangeable circulars - big difference in my arms not getting as sore.

The fabric that results from brioche is wonderful: ribbed and squishy and stretchable.  I used all three colors, switching between them every 20 rows or so.  My favorite part of this project was not sewing in any of the tails.  I worked a big long flat piece, being sure to switch colors and leave all the tails in the same place, and then I seamed up the long side (using corresponding colors and leaving those tails all on the inside) and just left all the tails in the middle of the big tube.  Take that, annoying tails - haha!

It's in the single digits now so I'm really loving this huge scarf.  Then ends of the tube are left open for when I forget my gloves but this would be really nice as an infinity scarf too!

Friday, January 15, 2016

Learning to Knit (if you already know how to crochet)

I learned to crochet first, and then learned to knit.  Why not, right?  I already had some spare yarn lying around and thought that knowing crochet should be beneficial in learning knitting.  In this case, it turns out that I made some major assumptions about knitting that I probably would not have if I started knitting first.  The key is figuring out which bits of information transfer to knitting and which do not.  I've been knitting for 2-3 years now and it's a wonderful addition to your arsenal of crafty knowledge.  Hopefully this little mini-guide will help save someone else the frustration I went through.  Here's what I learned:
  1. Learn how to look things up and keep yourself organized.  If you get stuck, google it or youtube it.  Especially in knitting, a video is worth a bajillion words.  I keep a bookmark folder on my browser for helpful tips I find and things I want to be able to refer back to later.  I also have a pinterest board just for knitting so I can keep everything in one place.  Also - if you don't already know about ravelry.com - go there!  It's a library of patterns for crochet and knitting plus a forum, plus help, plus awesome people.  You will need to make an account, but you'll probably end up wanting one anyway so you can keep track of projects you want to make.
  2. Holy crap there are so many abbreviations!  This may be true for crochet too, but you're already used to those and it doesn't seem like a big deal anymore.  You're going to have to get used to a whole new list of letters.  Get ahold of a nice guide to knitting abbreviations, like this one from craftyarncouncil.com.
  3. Where to start with knitting needles?  There are three main types of knitting needles.  (Crochet only really has 1.  It's a hook.  You hook with it.  There is a slight style difference between in-line and tapered hooks and you can put a fancy handle on it, but it's still a stick with a hook on the end and there's just one kind.)  Knitting needles are what you will be using to create your knitting projects (just like your crochet hook in crochet).  There need to be more than just one type of needle, because in knitting, you make all your loops for a row at once, so you need somewhere for them to hang out until you come back to them.  For knitting a flat item, you will either want to work it on straight needles, or on circular needles with a cable (but don't join, just work flat).  For working an item in the round, you will want to use either a set of double pointed needles, or circular needles with a cable.  So here are the three types of needles (and keep in mind that there are different sizes, lengths, etc for each type):

    3A. Straight needles.  These look like a big old toothpick with a stopper on the end.  Here are some pictures of straight knitting needles.  These needles come in sets of 2.  For a typical project worked on these needles, you will 'cast on' (in crochet you start with a chain, but in knitting you will start by casting on, or placing your first set of loops on your needles) stitches to one needle and then use the second needle to work the loops into stitches.  Your work will travel back and forth between the two needles.  In my completely ignorant opinion, I'm guessing these were the first kind ever made way back in the day.  You make some flat panels and if you want, sew them together to make clothes.
    3B. Double pointed needles.  (Nobody says 'double pointed needles' be the way, they say "DPNs".  See? Another abbreviation, just for the damn needles!)  These come in set of 4 or 5 and they are smaller versions of the straight needles except they have no stoppers on the end.  Here are some pictures of DPNs (double pointed needles).  These are used to work items in the round.  You will 'cast on' stitches onto one, and then distribute them onto 2 or 3 more needles to form a circle and work around and around, using a spare needle to work the stitches.  So this was probably the second kind or idea of needles.  "Hey!", said someone, "Let's just make the garment in the round so we don't have to sew up the seams later.  I hate weaving in Ye Olde Yarn Tailes!"
    3C. Circular needles.  These are the weird looking ones.  They look like two straight needles connected by a flexible cord.  Here are some pictures of circular needles.  You can work both flat and in-the-round items and they allow you to make very small or very large items.  Because these are a combination of straight and double pointed needles, you can use these exclusively to make any project.  (I'm sure there are exceptions, but these are my go-to needles.)  Important note about these needles - you have some options (of course you have more options, like three different styles of needles were not enough!).  These come in two different styles, fixed and interchangeable.  Fixed means that the cords are stuck onto the needles and don't come off.  If it comes off, it means it's broken.  With interchangeable, the needles and cords unscrew from each other so you can use different cords with different needles.  (You can also get cord connectors to make a super super long cord.)  This is the exact set that I own: Knitter's Pride Dreamz Deluxe Interchangeable Long Tip Knitting Needle Set 200601  Just one more note about using these.  One of the limitations of the circular cords is that they are fixed lengths.  If you try to make a small item on a long cord, your stitches will stretch and you won't be able to continue.  There is a method of knitting called the Magic Loop Method (look this up!!) that fixes this and it will be your new best friend and you will plan a June wedding with it.  These needles are my favorite!  This is the needle of the era of having plastic and glue and stuff.

    So - where to start?  What should you buy?  Just like with starting to crochet, you may want to start by buying a little "Learn to Knit", or "My First Little Knitting Thingy Set".  Think about how you started to crochet - probably with just one or two hooks and some standard worsted weight yarn and you learned how to chain and then single crochet or whatever.  That's probably how you should start knitting, too.  You will probably not want to buy my favorite set of circular needles for $60 the first day you start knitting.  (Unless you're made of money, because then go ahead, who's counting?)  Even if you end up loving one style of needles, you'll probably still use the other kinds occasionally.  Get a set of standard size (to match whatever yarn you'll be practicing with) straight needles and get the basics down before trying anything complicated.
  4. What your needles are made out of matters.  With crochet, it didn't seem to make much of a difference if my hooks were aluminum (my favorite), or acrylic or wood or whatever.  You're using the hook part to manipulate the yarn, so who cares?  With knitting, you'll want to figure out what works best for you.  I like wooden needles.  Aluminum, which worked so great for my favorite crochet hooks, feels awkward for a knitting needle because it's so slippery that my stitches ended up falling off the needles before I could work them.
  5. Basic stitches.  So in crochet, you start with a chain stitch to make a long chain, then you work into those chains using single crochet, half double crochet, double crochet, etc stitches.  You can also slip stitch and make big giant stitches by wrapping your yarn a whole bunch first.  In knitting, you start a project by 'casting on', which means adding a bunch of loops to your needles, and then into those cast on loops you work either a knit stitch or a purl stitch (knitting just has 2 basic stitches, the knit and the purl).  Then at the very end, you 'bind off'' your loops and your item is done.  But!!, it's not that easy (of course it's not!).  Although knitting may just have two basic stitches, there is a huge variety of ways you can do your cast on and bind off.  Like a frigging million ways.  But don't worry and don't get overwhelmed - just find one way you like and remember that way to start out.  The first way I learned to cast on was I think just the basic knitted cast on.  My favorite way now is the long-tail cast on.  So why are there so many ways?  Style and structure.  Some look prettier than others.  Simple!  The other reason is structure: one of the benefits of knitted fabric is that you can control how stretchy your fabric is.  So, you will probably want your fabric's stretchiness to match your cast on's stretchiness.  If your cast on is too tight or too loose, it might ruin a garment.  Same with your bind off, or finishing of your stitches.  Here's a nice little guide on Craftsy of some basic cast ons.

    One more point about actually working your stitches.  Where the yarn is when you're working your stitches matters.  There are two options: behind the work and in front of the work.  Pay attention to where your yarn is and what stitches you're working.  Beginner guides to knitting should mention where to put it but here are two basic rules to remember: when you make a knit stitch, your working yarn should be held in the back (before you go to make the stitch, move your yarn to the back) and when you go to make a purl stitch, the yarn should be in front of the work or on the side toward your body (before you go to make the purl, move the yarn to the front.)  If you don't put it in the right place, you'll make an 'accidental yarn over', which is adding another loop of yarn to your work that you didn't want and will look confusing when you come back on the other side of the row.
  6. Increasing and decreasing.  Again, knitting has a lot more options for increasing and decreasing than crochet does.  Normally your patterns will tell you what kind to use.  This is because they can look very different and can be the difference between a nice looking project and a crappy one.  And again with these, they don't have a nice name, they're all abbreviations, so keep a guide handy and be aware that you'll probably have to look them up each time you run across them.
  7. How to place a marker in knitting.  This is one of those examples of something that you think "Ok how hard can this be, I know how to do this in crochet."  Wrong!  The shape of the markers are different and the use is also different.  In crochet, you use a marker with a hook shape to go around the actual yarn of your stitch.  (I use paperclips with the ends bent up.)  When you come back to that stitch, you know your marker means you do something special or it's the beginning of your last round or whatever.  In knitting, markers are closed circles/rings and they slide onto your needle between the stitches.  So instead of referring to a specific stitch, a marker will be a stopping point between stitches and you will know you need to do something special starting at that point.  Your pattern will tell you something like "knit until two stitches before the marker" or "slip the marker (abbreviated "sm")".  Slipping the marker just means move it over to the next needle - nothing special there.  Markers for knitting are inexpensive.  You can buy some here, or make your own.  You can even just use a loop of contrasting color yarn!
  8. Basic types of knitted fabric.  There are a few types of fabric you'll want to master before moving on to more complicated patterns.  You'll be using the two basic stitch types: knit stitch and purl stitch.  The point of this is to learn how those two stitches interact with each other and how they look when worked on the front and back of the same fabric.  Keep in mind that this will be different depending on if you're working on a flat piece and turning it back and forth, or working in the round and only ever working on one side.

    A. Stockinette stitch.  This fabric is the classic knitted style featuring neat rows of V's.  (If you look at any of your t-shirts or sweatshirts, you will see tiny rows of machine made V's - same thing!)  To make this as a flat piece, you knit every stitch on the right side (which makes the V shape) and purl every stitch on the wrong side of the fabric (purls and knits are sort of the opposite of each other, so a purl on the wrong side will look like a knit on the right side).  In the round, you will knit every row, because you will only be working on the right side of the fabric.  Pictures of stockinette stitch.

    B. Garter stitch.  This fabric looks like little rows of ruffles.  In a flat piece, it's made by knitting every stitch.  In the round, it's made by knitting and purling alternating rows.  Pictures of garter stitch.

    C. Rib stitches.  Ribbing refers to vertical stripes of alternating knits and purls on the same side (instead of working all the stitches knit or purl like in stockinette or garter, you will switch between knitting and purling on the same side in the same row)  So ribs are made by alternating groups of knit and purl stitches of any number, but commonly you will work ribs of knit 1/purl 1, or knit 2/purl 2.  The knit stitches (looks like a V) tend to push out toward the front of the garment while purl stitches (looks like a horizontal bar) tend to push backward.  This creates a wavy, stretchy, ribbed fabric.
    More info on knit stitches.
  9. How to hold your yarn and needles.  In crochet, you hold the hook in your dominant hand and the yarn with your other hand.  Makes sense - you're doing all the real work with just one hand.  In knitting, both hands are a little more involved.  There are two styles of knitting: 1. English (hold the working yarn in your RIGHT hand) and 2. Continental (hold the working yarn in your LEFT hand).  The difference is pure personal preference.  Here's the interesting part to me.  Because you already crochet, and probably already hold the yarn in your left hand, most people will tell you that it will be easier to work continental and just keep holding that yarn in your left hand.  I found the opposite to be true.  You're not used to actually manipulating the yarn with your non-dominant hand like you will need to do with knitting.  You will probably want to learn both eventually because there are benefits to both, but I suggest starting with the English (yarn in the right hand) style.  I liked starting with this because each stitch felt like it's own separate, distinct process, so I could get used to making the stitches without a lot of finger waggling and stitch dropping.  This way also helps you use the yarn's own tension to pull the stitches where they need to go.
  10. A note on how to use the needles.  Because I crocheted already, I found myself subconsciously trying to use the needle as a crochet hook, and it will probably happen to you, too.  If you find yourself trying to coax your yarn with the tip of the needle, you're probably having this issue.  The key to knitting is to poke the needle into and out of your loops and slide the needle back and forth to manipulate the yarn.
  11. Dropping stitches.  This is apparently like the boogey man of knitting or something.  The crochet version, if there is one at all, would be accidentally pulling on your working yarn and ripping out the stitches you just made.  It's a bit of a bigger deal in knitting, because you have all your loops open and on the needles.  If you accidentally drop a stitch off of your needles, each loop below that loop in a vertical line can come unworked, all the way down to your cast on edge.  Fixing dropped stitches is not a big deal.  It's really not.  It may be difficult at first to identify exactly what's going on, but you have an advantage as a crocheter, because... you fix knitting mistakes with a crochet hook!  That's right!  You're already set up and ready to go because you already crochet.  (When I knit, I like to keep an appropriate size crochet hook nearby in case this happens.)  There are already a lot of guides out there that show you step by step exactly how to pick up dropped stitches, so I will just outline the process: (step 1 is don't freak out because you'll make it worse.  Gently set your knitting down on a flat surface and don't touch it until you identify exactly what's going on) basically you find where your stitch has stopped unraveling, stick your hook into the loop to keep it from ripping out more and chain just like in crochet, using the yarn in each row above to pull up a new loop to replicate what your knitting looked like.  I would suggest (after you learn how to make stitches) that you do this on purpose so you can learn what it looks like and how to fix it.  Make a little swatch of stockinette, work a few rows, then drop one stitch off your hook and tug on it a little and watch how the knitting unravels down each row.  Then figure out how to fix it so it won't be a big deal later during a project.  The more stitches that drop off, the harder it will be to fix, so do knit carefully!

    Lifelines: Something you should learn about right away is how to use a Lifeline.  All this is, is yarn of a contrasting color that you weave into your knitting with a yarn needle to keep it from unraveling in case you drop a stitch.  You may want to do this every few rows as you start out, or after you finish a particularly difficult row.  It works just like your knitting needle does.  There's something inside the loop, so it can't pull out.
  12. Learn how to 'read' your knitting.  You should also do this with your crochet.  (And if you can't look at your crocheted work and figure out what you did, now is a great time to take a moment and learn - it will help you when you start to knit as well!)  It will make you a better knitter/crocheter, help you fix your mistakes, and help you look at completed knitting/crocheting and identify how it was made.  Also - you will be able to figure out exactly where you are in a pattern or row so you don't have to start over.  Learning to read your work does take some time and experience, but keep in mind that it will come faster if you pay careful attention to what your stitches look like when you make them.  Don't just concentrate on getting it done, watch how the stitches are getting formed and what they look like before and after they are worked.  The main step to getting started is to be able to identify the difference between a knit stitch and a purl stitch.  When you look at the work directly below your loop on the needle, you with either see a "V" shape (that's a knit) or a little horizontal bar (that's a purl).  Be sure to work loosely enough so you can see the difference.  Here is a great guide I love about how to read your knitting.
  13. Learn how to do Tunisian Crochet.  Tunisian crochet is a great transition from crochet to knitting because it's like a combination of both of them.  There are special tunisian hooks you can buy, but you can also just use your current crochet hooks.  You'll learn how to pull up stitches onto your hook all along the row and then work them so you can get used to having a bunch of loops on your knitting needles.  My absolute favorite tunisian guides are from Mikey at the Crochet Crowd.
  14. How do you knit something that is longer than your needles?  This was a big burning question I had when I first started knitting.  In crochet, you can go as long as you want because you're completing each stitch as make it.  Not so with knitting - all those loops need a place to live until you bind off.  There are really two answers to this question.  One is - make a bunch of pieces and then sew them together to get the length you want.  The other - using very long cables on circular needles (and connect multiple cables with connectors) to get the length that you want.
So - getting started and some final thoughts...

There are a million knitting 101 guides, so really just pick one and start going.  (Just don't pay for one.  Remember that any company that wants to sell you yarn will give you information and patterns for free.  And there are a lot of yarn companies out there.  For example, here's a complete free guide on how to knit from Lion Brand.)  I would suggest learning how to cast on (any method) and then pull it off your needles and do it again until it feels natural.  Then learn how to work the knit stitch and just knit all your loops back and forth until that feels natural too.  Then learn to purl, then learn to use knit and purl to make patterns.  Then learn to bind off (any method).

Ok so once you've got all that down, you'll probably want to know what your first project should be.  I recommend making a scarf.  It's simple in design and has no increases or decreases.  You can make it any dimension you want and use any combo of knits and purls you want.  If that sounds boring, google 'first knitting project' and find something you like.  Keep in mind that your choice of yarn will make a difference.  Pick a fiber content that is slightly stretchy and can take a bit of a beating.  Acrylic is perfect, but I would not recommend cotton (no stretch).  No need to spend a boat load of money for your first try.  Make sure it's a light color because they are easier to work with.  Pick a thickness of yarn that will be easy to use as well - the bigger the better in my opinion.  Worsted weight will work just fine too, just don't go too small that you can't see what you're doing.

One last little tip.  I like to keep a project journal for all my creative endeavors, whether it be knitting, crochet, origami, sewing, etc. where I write down the date, the project, the materials, etc so I can look back on it and see what I've done already.  This is especially helpful for recalling what brand/color/size/hook/needle that you used for a project.  If you ever want to know, it's all right there in your journal.  I use a big graph paper notebook just like this one.

I hope you give knitting a try!