snowy field image

snowy field image
Showing posts with label DIY. Show all posts

Saturday, October 22, 2016

Fall Leaf Paper Lantern

This picture wouldn't focus because it was dark and it turned out all artsy.
A Saturday in the middle of October is perfect for making paper lanterns.  The days are getting darker and colder and I need some candles in my life.

This is a fairly simple project to make and you can customize it for any holiday or occasion.

I started with a piece of 12 x 12 paper that came in a big book from Michael's and cut it in half so I had 2 pieces of 6 x 12.  It's not truly 12 x 12 so there's an extra little lip to help glue the sides together.


It's a bit hard to see but the above photo is divided into 4 sections that are 3 inches wide plus a tiny lip on one side.  I used a bone folder to score the paper so it would fold easily.


Trace a leaf shape on each of the 4 big panels.  You could put anything on there, I just happen to have some leaf templates from the wreath I'm making.


Carefully cut out the leaf shapes with a very sharp exacto blade or craft knife.  I use a piece of cardboard underneath from an Amazon box.  I cut out the leaf in one piece so I have the leaf shapes to put on the table for decoration.


Here are all the leaves cut out and the right side of the paper up.


Next I cut out a rough rectangle of white tissue paper big enough to fit over the entire card stock.


Trim down the tissue paper to size and attach it to the back side of the paper.  I like to use this tape adhesive so the papers don't wrinkle and there is no mess.  It makes a huge difference in projects like this.  Once the tissue paper is attached, you can connect up the sides of the box using the thin tab on the side.


All done.  I did not put a bottom on the box so that it's easier to use with a candle.  Feeling cozy and ready for cooler weather.

Monday, January 18, 2016

Adventures in Giant Knitting and Claire's Cowl


I've been wanting to make this beautiful giant knit for a while.  I love the look of very big or very small stitches so this one is right up my alley.  I had to improvise a bit on the needles and yarn.  The pattern calls for 19mm needles and chunky yarn and I didn't have either.

My improvised needles are 19mm dowel rods with the ends carved down to points.  I just happened to have the dowel rod pieces in the house and they were already cut to perfect lengths so I really just had to make them.  It was a new process and very interesting.  My wood pieces are actually two different kinds of wood.  The shorter one is lighter colored and much softer.  It was easier to carve but the finished needle is more prone to dents and pokes from the tip of the harder one.

For the carving process, I chose a pocket knife with a partially serrated blade (I don't know that I would have been able to do it with a smooth blade, especially with the harder wood).  For the pointed tip, I started about an inch and a half back from the end and gently started to remove some wood until I had a rough pointed shape.  Then I carefully smoothed it out into a proper point.  I probably did this a dangerous way, but I found it a lot easier to pull the knife toward me to remove the wood rather than slashing away from me.  I took as much care as I could and didn't have any unfortunate accidents.  I did round off the back ends of the rods so the corner edges wouldn't poke me.  I found knitting in a big size requires a lot more whole body action.

After I was happy with the basic carved shape, I sanded it with first a coarser 80 grit sand paper and then with a very fine 220 grit.  The sanding actually got it to be very smooth.  I did rub the raw areas with a tea light candle to get a bit of wax into the tiny grooves.

I really can't believe how well these turned out in terms of smoothness and ease when knitting with them.  I didn't have any issues with the yarn snagging or hanging up on any rough spots and the wood was light enough to be easy to work with.

For the knitting project itself, I held 4 strands of worsted weight acrylic together and made a garter stitch rectangle about 21 stitches by 60 or so rows.  I did not add a twist for the mobius style on this one.  This was really fun and I learned a lot.

Thursday, December 10, 2015

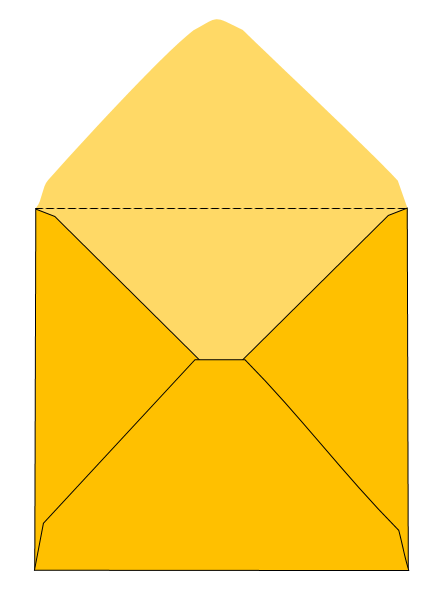
How to make an envelope of any size without a pattern


If you want to make an envelope out of pretty scrapbooking paper but don't have a spare plain one to make a template, you can easily make one by following some basic principles of folding.  This is great if you need a teeny tiny envelope like above, or a giant one.  The basic construction of an envelope is fairly simple: a square or rectangular paper, larger than your note or card, which is folded around it to contain and conceal it.  Sounds simple right?  However when it comes down to making your own, suddenly there are corners and flaps everywhere and things get a little muddy.

Start with a square of paper and find the center.  Either match up opposite corners and gently pinch the middle or use a straight edge and lightly mark lines with a pencil.


Fold two opposite corners to the center.  (Then unfold)  These will be the side flaps.


Now fold the other two corners past the center point and unfold.  Just how far past the center you want to go will determine how square or rectangular your envelope will be.

You now how something like this: (turned 45 degrees)


The dotted square represents a shape slightly larger than your note.  Fold all your corners in and take a look at what you have.  You can adjust your folds or add some details.  You will probably want to clip the excess paper where the folds meet and shape your corners; clip the folds at a wider angle to avoid bunching, round off the top corner and cut off the bottom corner flat where it meets the two side flaps when folded.

To fold your envelope, first fold in the two side flaps, then the bottom, and lastly the top.  You can secure the sides to the bottom with glue or tape, or leave them open.


Tuesday, December 8, 2015

3D Christmas Tree Cookies


These didn't come out quite as well as the reindeer, but it's a good first effort.  I probably need to go back and redesign the cutter a little.  The slots are much deeper so they need to fit better than shallow ones.  Still fun to decorate and eat.

I could make this one much easier on myself and have one cutter that is a whole tree and another that is a half and just use one whole and two halves and stick them together with icing.  Then I wouldn't have to worry about the slots... hmmmm... or just use one cutter for the whole tree and cut some of them in half.  Would have to be careful though.

I could also put stars on top before baking and have them bake together in the oven.

Thursday, November 26, 2015

3D Gingerbread Reindeer Cookies (now with printable template)

Yay I'm a reindeer cookie!

I'm so excited that this actually worked!

I saw a beautiful photo a while ago of little reindeer cookies that stood up and were put together with 2 cookie cutter designs for the body and legs.  After some fiddling I was able to draw some templates and cut them on card stock to trace around on some gingerbread dough.  I ambitiously went for a third design for some antlers as well as the body and legs.

The cookie recipe is derived from this great post at bakingamoment.com

I halved the recipe and forgot to halve the spices so I ended up with some very gingery cookies.

My first attempt was a bit unimpressive but it actually worked!  The shapes fit together and stood up.


I learned a few things from these first ones:
  • My cookie recipe was good - no baking power or soda, cold dough, and short fast baking time.  The cookies did not expand and looked pretty much like they did when I cut them out.
  • Sharp corners burn!  His poor little tail!  All of my shapes needed to be rounded or thickened so they baked evenly.  
  • If your locking shapes are slightly off, you can gently cut them with a serrated knife when they are hot from the oven.  
  • If the shapes are too small, there will be weak points where they will be more likely to break.  One set of antlers didn't make it!
  • Cutting cookie shapes by hand with a knife and a template is boring and horrible.

 So... how to make your own custom cookie cutter?  I could probably order one and later I found a few very cute etsy shops that will 3D print cookie cutter designs for you.  But I wanted to make these now!  First I tried using the metal from a soda can, which proved too weak and brittle.  When you bend it at a 90 degree angle, the metal cracks.

Then I found an old cookie tin with thicker more bendable metal in the back of our pantry.  It was a beast to take apart but with some pliers and our kitchen sheers I was able to get some 3/4 inch wide strips of metal (aluminum maybe?) out of it.  With my new designs, I traced my 3 templates onto cardboard and used the pliers to bend the metal into shape.

Card stock and cardboard templates.  Looking so good!
Home made cookie cutters.  I'm freaking out, man!

It took a lot of patience and cursing to get the metal shapes right.  But finally, they came out and they actually look like the design.  I did not roll the tops of the metal down to make a hand-friendly cutter, so to actually use these, I pushed them down with a square of cardboard.  Otherwise, I would have some adorable shapes poked into my hands.  

I cut enough shapes for 5-6 cookies and "decorated" them.  Honestly they looked a lot more classy before I trashed them up but they taste great and I had so much fun digging through my decorations.  I opted not to attach all the pieces to form the deer, so they're just standing up on their own with the interlocking pieces.

Seriously my decorating is awful.  Observe these pictures at your own risk:


You can see the gingery pain in their little mini chocolate chip eyes.  Kill meeeeee!  So many possibilities for different shapes with this idea... maybe some dinosaurs next???

Here's a little template on graph paper.  Each little square is 1/4 of an inch.  If I can figure out how I might make a printable thingy but I'm not sure how to do it.

1/4 inch graph paper (each square is 1/4 inch)

Happy Thanksgiving!

EDIT: Here's a link to a googledrive document that has a printable template in two sizes.  I used the smaller size for my cookies.  This is meant to be printed on 8.5 x 11 paper and there is a scale for inches at the top.

Thursday, October 29, 2015

My Super Boring Hobby

I have a lot of 'boring' hobbies that involve staying inside and slapping around pieces of things until they make something else.  I have to restrain my excitement when I talk to people about what I do with my free time, because to most people, this is the equivalent of watching paint dry.  I love it though!  This is one of those hobbies.

Whenever I find a cool free crochet pattern online, I like to make a diagram of it for fun.  I like making little pictures and understanding construction through graphics.

Here's an example from Moogly's Fortune's Wrap.

Row 1 says to chain 6, dc in the 4th chain, chain 1 & skip a chain, then dc in the last chain.  So I draw my little yarn tail, 6 chains, dc, chain, and dc.  Sometimes I like to fade the colors of each step so you can tell what order you're doing things and what direction you're going.

Row 1
Then for this pattern, you turn your work, so I turn the graphic around and turn it 90 degrees to the right so I'm ready for the next row.

Row 2 says to chain 6, dc in the 4th chain from the hook, chain 1 & skip the next stitch, then dc in the last ch so first I make that part in blue.  Then you put a slip stitch, chain, double crochet, chain 1, double crochet in the chain 3 space from the first row, so I put that in a different color.


Woo so fun!

Wednesday, October 7, 2015

Tissue Paper Carnations

I love carnations.  They come in pretty colors, they're cheap, and they last a long time in a vase.  I do have to be careful that our kitties don't get into them though.  The ones I have right now are starting to die off and fall apart.  I was looking at them and thought how much they look like tissue paper so I thought I would try to make some.  They came out pretty well.  It's easy to find tissue paper in the right colors and the other materials are easy to improvise.

To make mine I used:
  • Tissue paper (if you want a pattern you could use cupcake liners, and they are already in the right shape)
  • Safety eyes (you could also use brads)
  • Thick paper/card stock/note cards
  • Glue & tape
  • Drinking straws
  • Green paper/washi tape/floral tape (mine was origami paper)

To start I cut some small squares of tissue paper.  I didn't really measure this, I just folded the length of tissue paper until I had it down to a small enough size and then made squares based on the folds so I could cut a lot at one time.  Probably around 3 or 4 inches square and it's ok if they are not perfect because you will be cutting them.  I used about 10-12 squares for each flower, and it's best if you cut all the squares you want for each flower so they are the same size.  You could use more or less squares depending on how full you want the flower to look.

To make the flowers, fold each square in half and then into thirds to make a 6 petal flower.  Then cut through all layers to make a petal shape.  You can also cut slits in the top of the petals to make them look more realistic.  (I tried to use my pinking shears for this but they're really cheap and just smooshed everything around.)  Then open it up to see your flower.


Once you have all of your flowers cut out, poke a hole in the center of each flower and stack them all up together.  Make sure they're all turned different directions so the petals don't line up.  Push your safety eye or brad through all the holes and secure.  I used a safety eye here and it was a little difficult to close the backing without tearing the paper.  I popped the backing onto the first notch with my hands and then set it right side up with the backing resting in the groove of a spool of thread and tapped the top of the eye with a hammer until it closed.

When they are all secured together in a stack, use your thumb and index finger to make a circle and push all the petals upward and together.  Squish the bottom a little to help it take shape.  To preview how it's going to look with a different number of petals, you can use the cap of a marker or seam ripper and a pen or crochet hook to gently push the petals down into a cone.

For the stem, I used some drinking straws.  I wanted the stems to be a little thinner than the straw so I cut a slit up the length of the straw and overlapped the edges a bit and taped it back together.  I finished the stem with pieces of note cards and green paper.

I still need to take some pictures of my finished flowers!

Monday, August 31, 2015

Flagging Tape Plarn


I was walking by a construction site near my work and they had this plastic tape stuff strung up so nobody walked into the new asphalt.  It looked so pretty I wanted to run off with it and crochet something.  Turns out it's called surveyor or "flagging" tape and it makes cheap, fun plarn in a ton of colors without any cutting and tying.

I didn't do any rolling or fiddling, just crocheted straight off the roll.  This would be wonderful for outdoor projects.  It's made specifically for use outside, although I imagine it will fade after a while in the sun.


The test blob I worked up feels strong and stretchy.  So far I just have the pink but apparently you can order it in solids, stripes, and polka dots.  How fun!

Paper Flip Flops

Summer is finally on it's way out.  I'm saying goodbye with some tiny little flip flops.  I used paper for the base and ribbon for the thong but you could use just about anything.  Craft foam and cloth would be super cute.  The pink flowers are origami irises.


Here's a little diagram of how to put them together.  It's pretty easy, I just like making little diagrams.


Thursday, August 20, 2015

Homemade Hairpin Lace Loom

I decided to try to make a loom rather than buying one.  They're so simple looking, I just couldn't justify spending the money.  This is my little practice version made of wooden skewers from the kitchen drawer and some cardboard box parts (I think from some $1 glowsticks from Target - it was a "wild" night.)  It works perfectly well for my needs right now.  It would be easy to do an upgrade with some coat hangers or unused straight knitting needle and maybe some plastic.


Monday, July 6, 2015

Smart Phone Microscope

A while ago we saw an instructional video about how to make your own microscope stand very cheaply that works with a smart phone's camera.

Original video:

We slowly gathered all the materials and saved 'trash' items until we had everything we needed to put together a little test version.  Total cost for us was $0.00 as we used junk and things we already owned to put it together.  We didn't have an appropriate size paddle bit or long bolts.  Instead of drilling a hole through our board (a scavenged pull-out writing extender from a desk) I hot glued the bottom of the bolts in place.  Our 'specimen' stage was not adjustable because most of the nuts did not fit onto our bolts and we had no wing nuts so I did a bit of spacing adjustments using washers and nuts.  It's still a bit unsteady but I was able to successfully capture some close up images!  I have an older iPhone and no photography skills but I was really tickled that it actually worked.  I think that the lens we used from an old laser pointer is 40x magnification but I'm not sure.  The phone's camera can zoom in as well to get a higher magnification.  This is my first little batch of photos.

Coin

Coin

Coin

Coin

Packaging

A little piece of hot glue fiber

Yarn

Small piece of aluminum foil

Decorative embossing from a card

Card

Card

Marker on paper from our spirograph

Spirograph

Spirograph

Black ball point pen on paper

More black pen

Little glob of dried hot glue

3 3/4 from my crochet hook sizer

Boye crochet hook sizer

Plain white paper

In God we rust?

Honest Abe!

MERICA!

More coinage

Coin

Ruler on crochet hook sizer

Cotton yarn from a coaster

Yarn

The edge of a manicure tool

From a plastic PaperMate mechanical pencil

Nail file

One more coin
We should be able to make some improvements like an adjustable stage and some lighting.  A more recent phone with a better camera would make a huge difference as well.  This was so and surprisingly easy to put together.